How-To Guides
How to Replace a Dryer Door Switch (Complete DIY Guide)
AZparts Team
Updated on December 28, 2025
12 min read
Wondering how to replace a dryer door switch? This quick and easy repair could be just what your dryer needs to get running again. The door switch tells the control board to stop the machine when the door opens. If the drum light stays on when you press the switch lever, it's time to replace the broken dryer switch. In this guide, AZParts will help you find the exact manufacturer-approved part so you can complete the repair with confidence and restore your dryer’s performance in no time.

Key Takeaways
- A faulty dryer door switch is a common safety-related issue that can prevent your dryer from starting, cause it to stop mid-cycle, or even allow it to run with the door open.
- Clear warning signs include the dryer not starting, the drum light staying on when the door is closed, no clicking sound from the switch, or unexpected shutdowns during a cycle.
- Replacing a dryer door switch is a manageable DIY repair with basic tools, proper safety steps, and careful wiring reconnection.
- Always unplug the dryer (and shut off gas if applicable) before starting repairs to avoid electrical or safety hazards.
- Installing a new door switch restores proper operation, improves safety, and helps extend the overall lifespan of your dryer.
1. Common symptoms of a faulty dryer door switch
The dryer door switch is a small but critical safety component. It acts as a sensor that tells your machine when the door is open or closed. If this switch malfunctions, your dryer won’t receive the signal to start or stop properly, leading to operational issues or safety concerns. Below are the most common signs of a faulty dryer door switch that you shouldn’t ignore:
- The dryer won’t start even when the door is fully closed. This is the most obvious symptom. The dryer relies on the door switch to confirm the door is securely shut before beginning a cycle. If the switch is broken or not engaging, your dryer won’t start at all. In some cases, issues with the door latch or door catch may be mistaken for a faulty switch. It's helpful to inspect both when troubleshooting door-related problems.
- The drum light stays on with the door closed: Most dryers have an interior drum light that turns off when the door is closed. If the light remains on, it’s a clear indication the switch is not registering the door as shut.
- The dryer stops mid-cycle unexpectedly: A faulty door switch may intermittently lose contact, causing the dryer to stop running mid-cycle as if the door has been opened.
- No clicking sound when pressing the switch: Normally, pressing the door switch produces a distinct clicking sound, indicating it’s engaging properly. If you don’t hear a click or the switch feels mushy or loose, it may be broken internally.
- The dryer runs with the door open (safety issue): If your dryer continues to run even when the door is open, it’s a serious safety concern. The door switch is meant to immediately stop the appliance when the door is opened. A faulty switch could disable this function.
- Door doesn’t latch securely: Sometimes, it’s not the latch itself that’s the problem—it’s the door switch that fails to detect a closed position, making it feel like the door won’t stay shut or is loosely connected.
Tip: You can quickly test the door switch by opening the dryer door and pressing the switch lever by hand. If the drum light stays on or the dryer doesn’t respond, the switch is likely faulty. Spotting these signs early makes it easier to understand how to fix door switch on dryer, helping you avoid costly repairs and get your appliance back to normal faster.
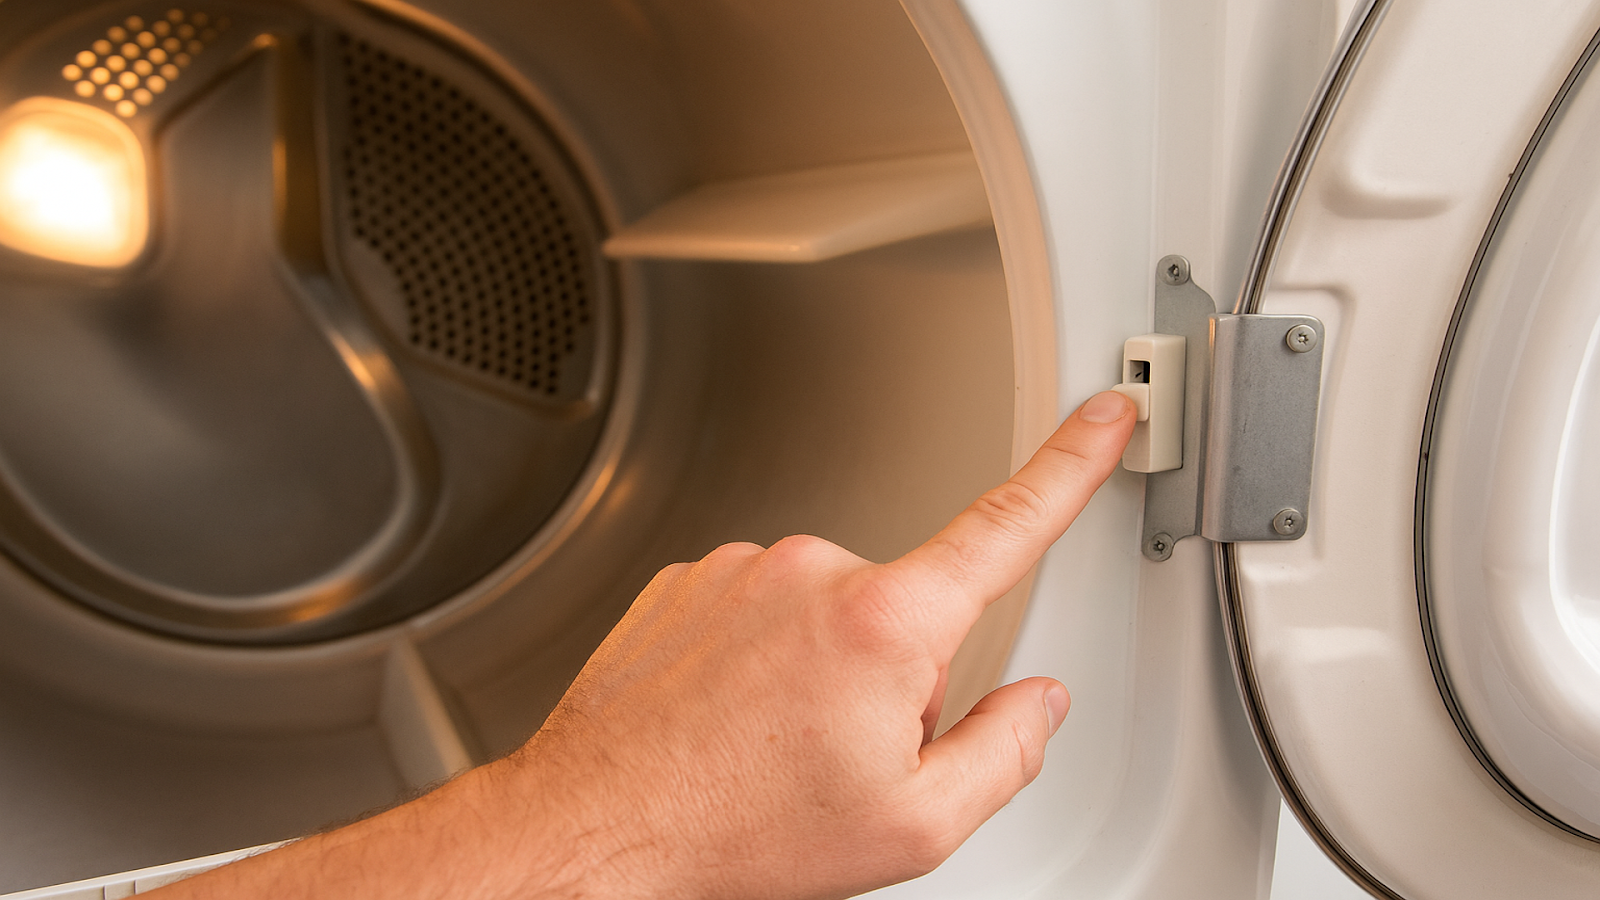
Testing a Dryer Door Switch for Malfunction (Source: AZParts)
2. How to Replace Door Switch on Dryer
Replacing a dryer door switch may sound complicated, but with the right tools and guidance, it's a repair that most DIYers can handle confidently. Follow the steps below to troubleshoot, remove, and install a new dryer door switch the right way.
2.1. Step 1: Gather Your Materials and Tools
To begin, collect the tools and replacement parts needed for the job:
Tools:
- Phillips-head screwdriver
- Flat-head screwdriver or putty knife
- Needle-nose pliers (optional, for wire handling)
- Work gloves
Parts: If your dryer is older or showing multiple signs of wear, you might also consider checking the drive belt, idler pulley, or drum support rollers. These parts often age together and can impact overall dryer performance.
2.2. Step 2: Safety First
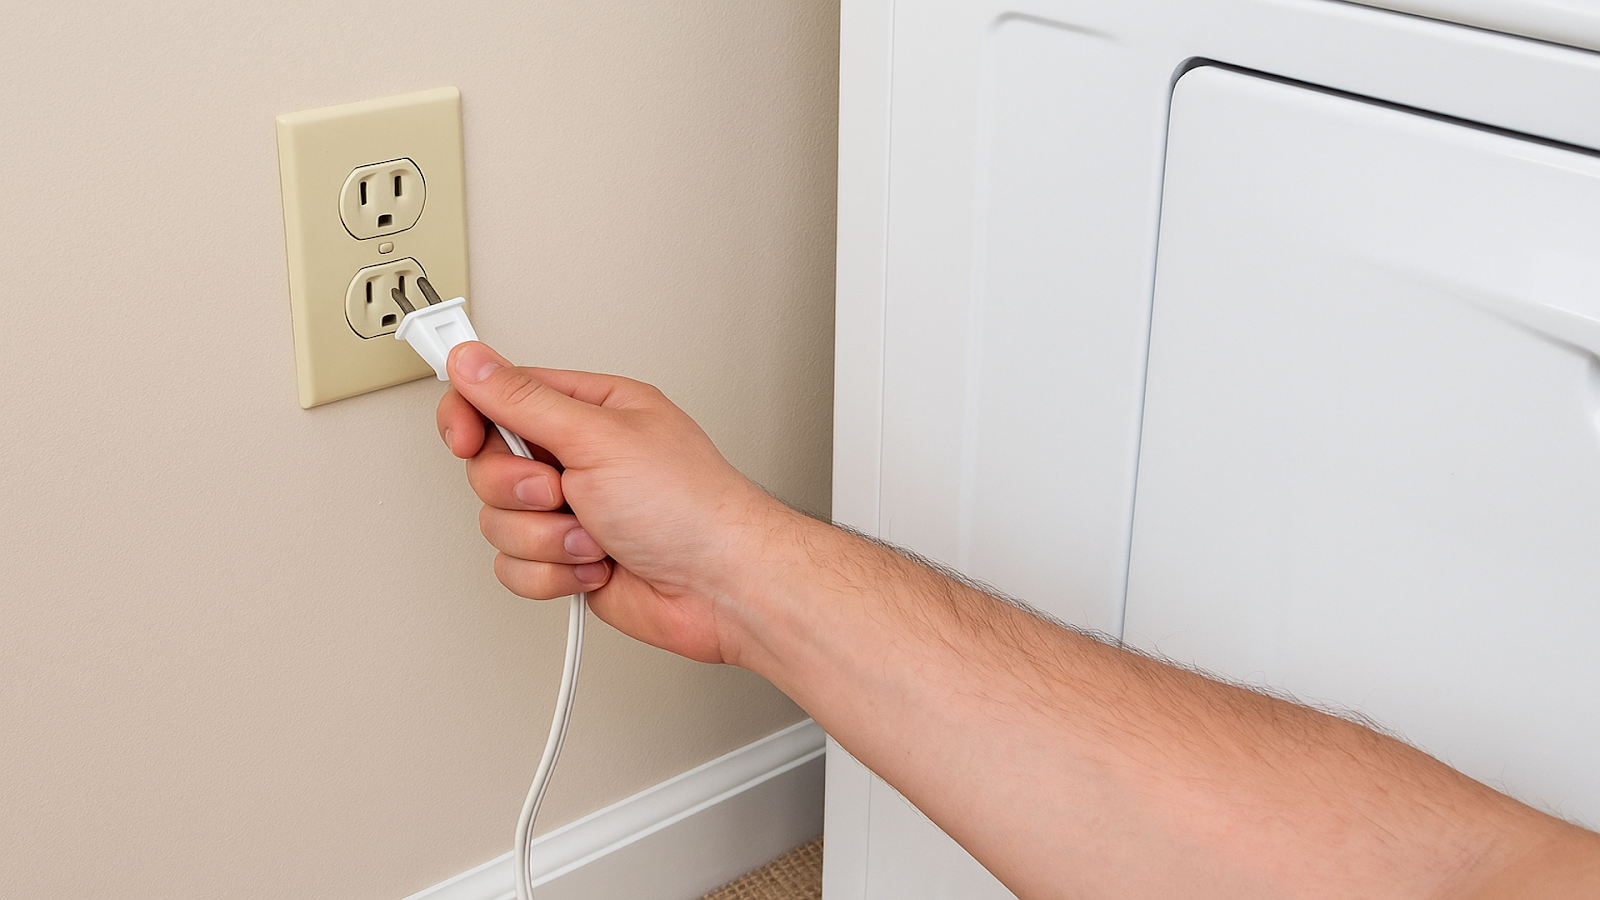
Unplugging the Dryer for Safety Before Repairs (Source:AZParts)
Before doing anything else, make sure to put safety first. Always unplug the dryer from the wall outlet to eliminate the risk of electric shock. If your dryer is gas-powered, be sure to turn off the gas supply at the shut-off valve to prevent any leaks or accidents. Finally, allow the dryer to cool down completely before starting the repair, especially if it was recently used. Taking these precautions ensures a safe and smooth repair process.
2.3. Step 3: Access the Broken Door Switch
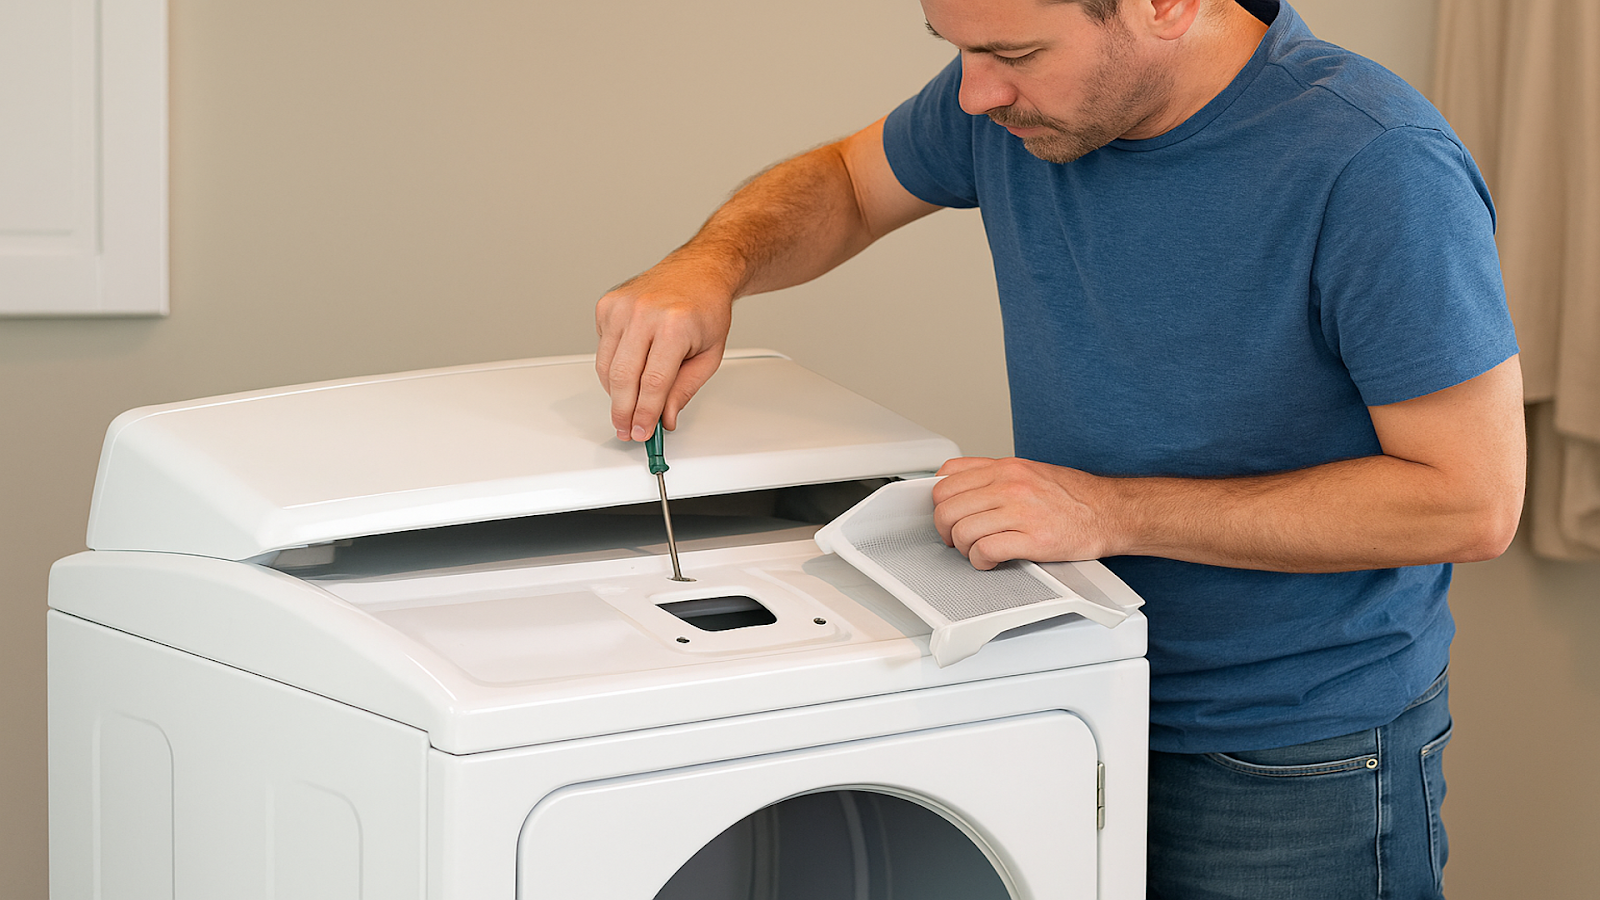
To access the door switch, you’ll need to remove the top panel of the dryer. Start by removing the lint filter from the top of the machine. Just beneath where the filter sits, you’ll see two Phillips screws—go ahead and unscrew them and set them aside in a safe place.
Next, take a flat-head screwdriver or similar tool and insert it into the gap between the top panel and the dryer’s body, about 3 to 6 inches from each edge. Carefully pry upward on both sides—this may require a bit of pressure to release the internal clips.
Once both clips are disengaged, you can lift the top panel of the dryer. It should swing open like a car hood, giving you clear access to the internal area above the door where the switch is located.
2.4. Step 4: Disconnect the Faulty Switch
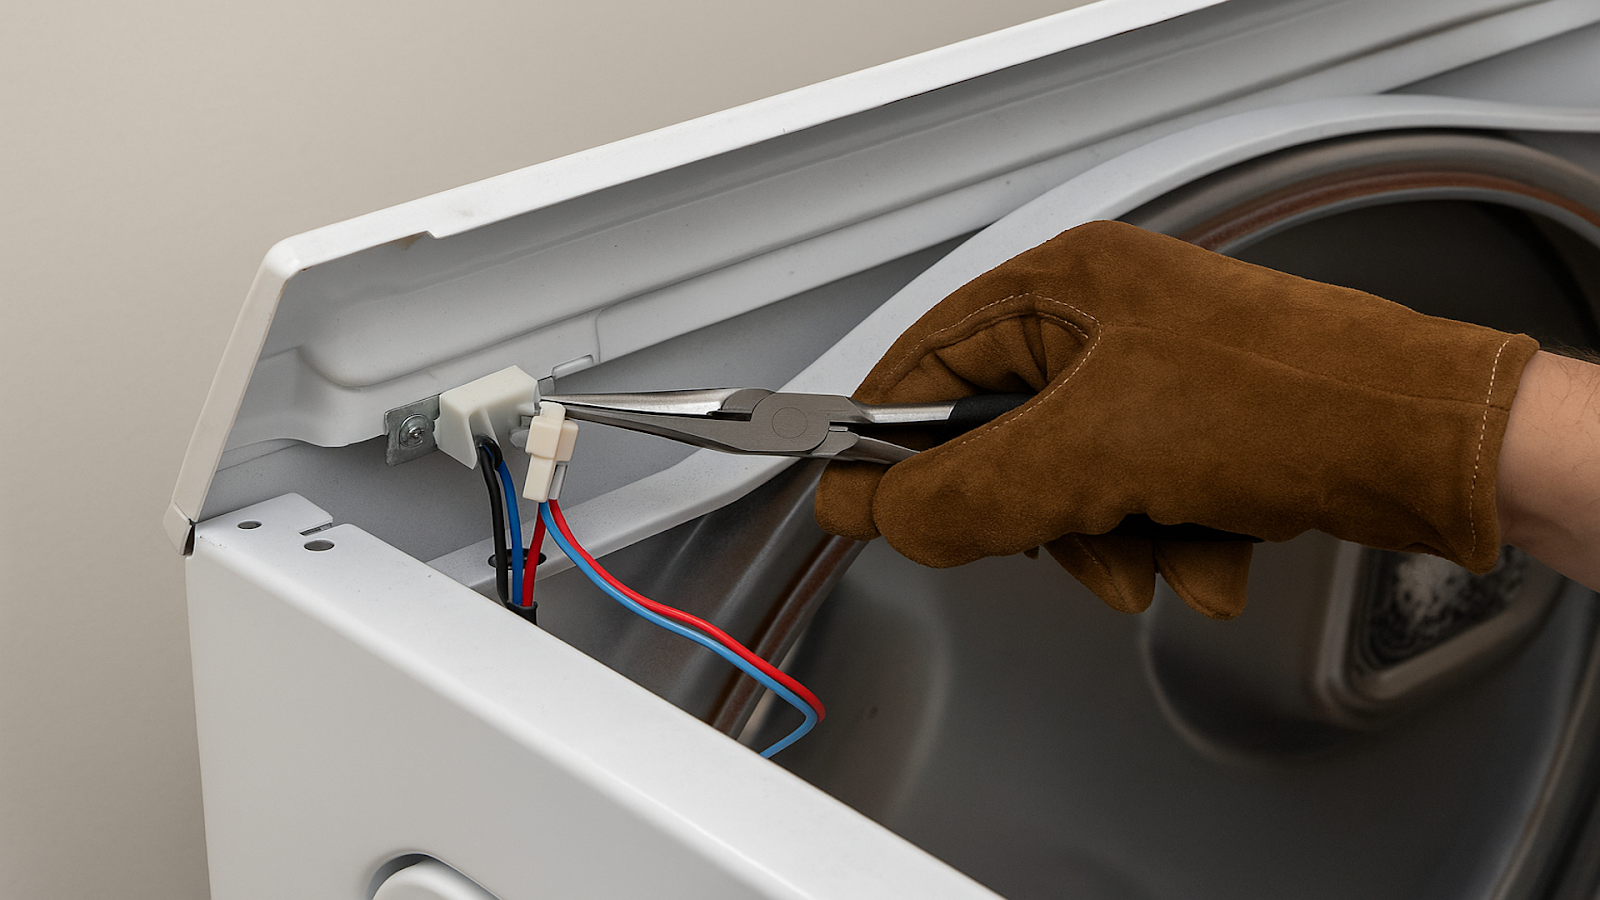
Using Pliers to Remove Wires from a Faulty Dryer Switch (Source: AZParts)
With the top panel lifted, you should now be able to clearly see the door switch and the wires connected to it. Before removing anything, it’s a good idea to take a photo or jot down a quick note of how the wires are arranged, this will help ensure you reconnect everything correctly later.
Once documented, gently disconnect the wiring harness from the old switch. If the connectors are tight, you can use needle-nose pliers to carefully wiggle them loose, but avoid pulling too hard to prevent damaging the wires.
2.5. Step 5: Remove the Broken Switch
Now that the wires are disconnected, it’s time to remove the faulty switch itself. Start by opening the dryer door and looking along the top edge of the door frame—you’ll spot the switch held in place by two small screws.
Carefully unscrew them one by one, using your free hand to support the switch from behind. This will prevent it from slipping inside the dryer once loosened. After the screws are fully removed, simply guide the switch upward through the opening at the top. At this point, the damaged switch should come out easily, clearing the way for installation of the new one.
2.6. Step 6: Install the New Door Switch
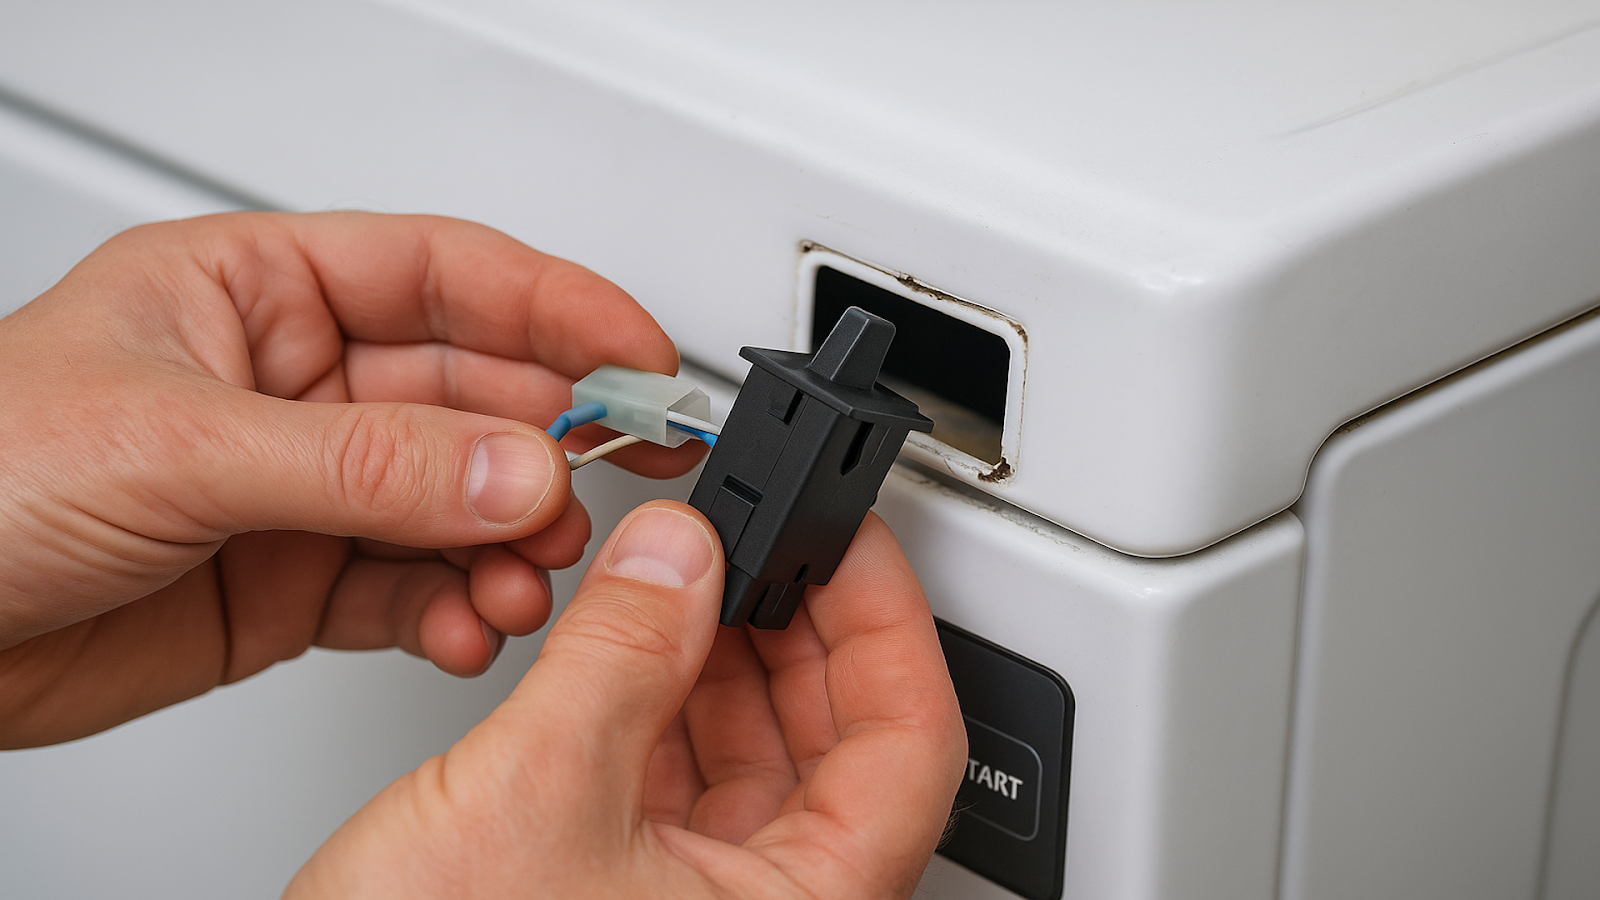
Fitting the New Door Switch into Place (Source: AZParts)
With the old switch out of the way, you’re ready to bring in the new one. Take the replacement switch and connect it to the wiring harness, making sure everything lines up just like before. If you’re second-guessing the placement, now’s a good time to glance at the photo you took earlier.
Once the wires are securely in place, carefully guide the switch down through the top opening. It should slide in smoothly. Don’t force it—if it doesn’t sit right, adjust the angle until it fits naturally in the mounting slot. The goal here is a snug, well-aligned fit so everything works as it should.
2.7. Step 7: Reconnect the Wiring
To ensure your dryer door switch works correctly, follow these simple wiring steps:
- Double-check the wiring layout against your reference photo or diagram. This ensures you connect the right wires to the right terminals.
- Firmly connect the wiring harness to the new dryer door switch. Push each connector until it clicks or feels secure.
- Inspect each terminal to confirm it is fully seated. Loose wires can cause the switch to malfunction or fail completely.
- Gently test the connections by tugging each wire—if it moves or slips out, reconnect it more securely.
Proper wiring is critical to a successful dryer door switch replacement. Taking a few extra seconds to verify connections can prevent issues later
2.8. Step 8: Reassemble the Dryer
Securing the Dryer Top Panel with Screws (Source: AZParts)
To complete the dryer door switch replacement, follow these steps to reassemble the dryer safely:
- Close the top panel of the dryer. Press down gently but firmly until it clicks and snaps securely into place.
- Reinsert the two screws that were previously removed from beneath the lint filter opening. Tighten them using a Phillips-head screwdriver.
- Reinstall the lint filter into its compartment to ensure proper airflow during dryer operation.
Reassembling the dryer correctly ensures the appliance is safe, functional, and ready for testing. Always double-check that all panels and components are secure before plugging the dryer back in.
2.9. Step 9: Test the Dryer
Now that your dryer is reassembled, it’s time to test whether the new door switch is working correctly:
- Plug the dryer back into the power outlet, and if your unit runs on gas, don’t forget to turn the gas supply back on.
- Open the dryer door—you should see the drum light turn on. This indicates that power is flowing and the door sensor is active.
- Gently press the door switch lever with your finger. If the drum light turns off, the new switch is properly detecting door position.
- Close the door completely and start a short drying cycle.
- After a few seconds, open the door mid-cycle. The dryer should immediately stop running—this confirms the door switch is functioning as a safety cutoff.
By running this simple diagnostic check, you verify that the dryer door switch replacement was successful and your appliance is ready for regular use.
2.10. Step 10: Final Checks and Celebration
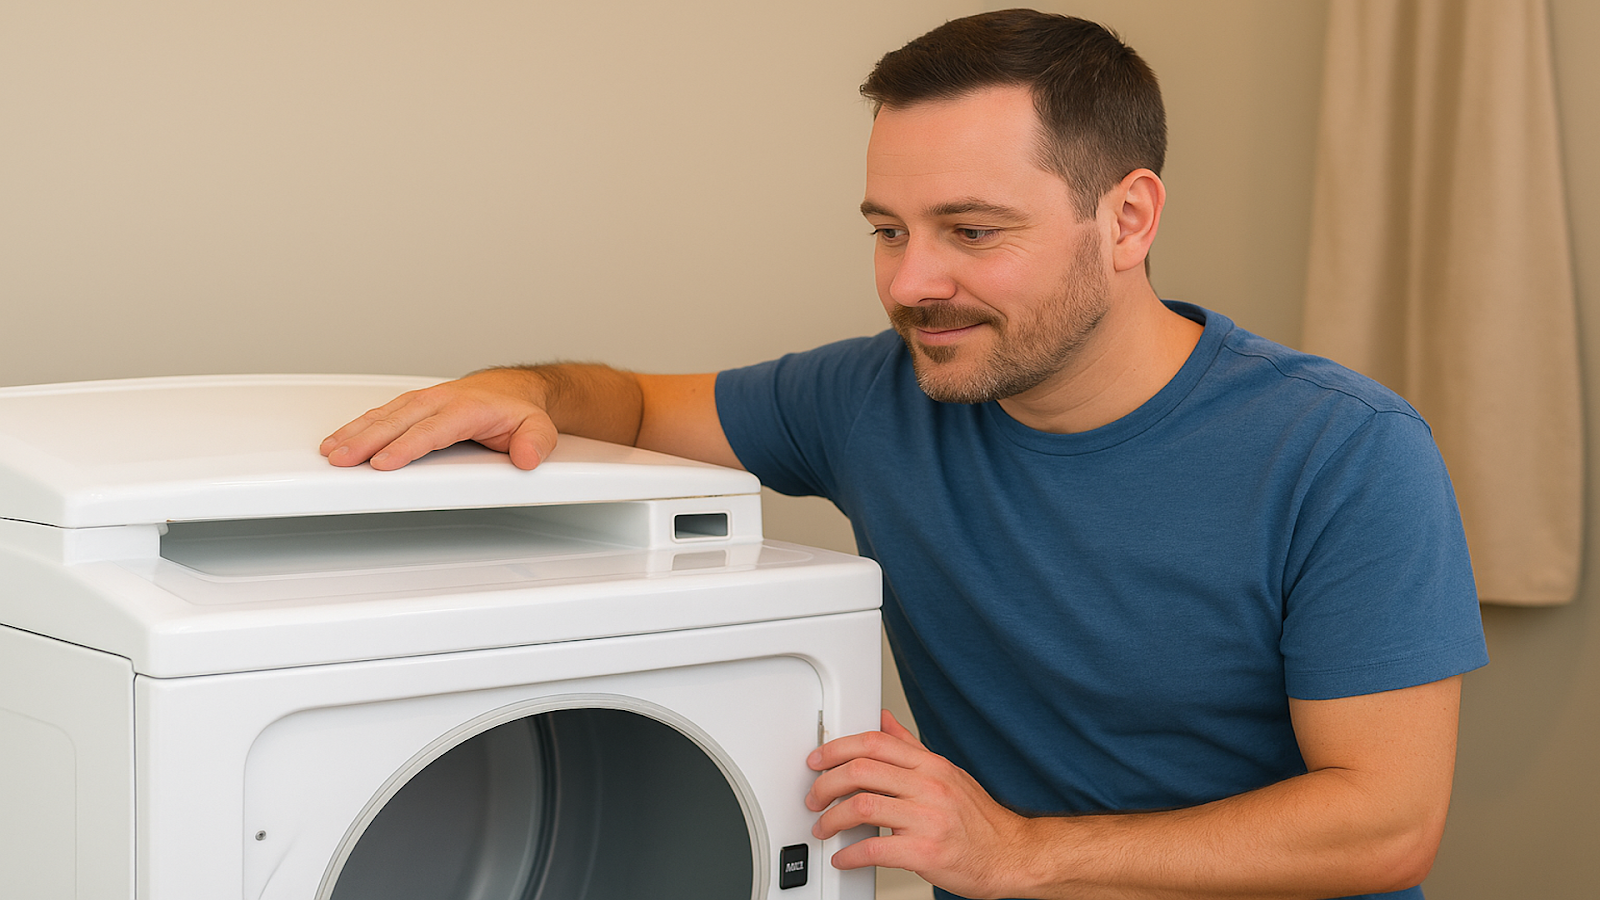
Inspecting the Dryer After Successful Repair (Source: AZParts)
If everything works as expected, the dryer starts only with the door closed and stops when opened. You’ve completed the repair successfully.
Replacing a dryer door switch not only saves you money but also extends the lifespan of your appliance. Common replacement parts that pair well with door switch repairs include the thermal fuse, start switch, blower wheel, or even a new door handle for better usability. Keeping these essentials on hand helps you handle quick fixes without delay.
3. FAQs about Dryer Door Switch Replacement
3.1. How do you change the door switch on a dryer?
To replace a dryer door switch, begin by unplugging the dryer to ensure safety. If the dryer uses gas, turn off the gas supply as well. Next, remove the lint filter and the screws underneath it. Use a flat-head screwdriver or putty knife to release the top panel clips, then lift the top to access the switch area. Open the dryer door and remove the screws securing the old switch to the door frame. Disconnect the wiring harness from the faulty switch. Install the new switch by connecting the wires, placing it into the mounting slot, and tightening the screws. Close the top panel, reinsert the screws, reinstall the lint filter, and test the dryer to ensure proper function.
3.2. How do you know if your dryer door switch is bad?
There are several signs that indicate a faulty door switch. If your dryer does not start when the door is closed, the switch may not be detecting the closed position. If the drum light stays on after closing the door, it suggests the switch is stuck or not engaging. Another symptom is the dryer continuing to run even when the door is opened, which can be a serious safety issue. You can also test the switch manually by pressing the lever while the door is open—if the light doesn’t turn off or on as expected, the switch may be defective.
3.3. How much does it cost to replace a dryer door switch?
The price of a replacement dryer door switch typically ranges from 10 to 30 USD, depending on the brand and model. OEM (original equipment manufacturer) parts may cost more than compatible third-party alternatives. If you hire a technician, labor costs can add another 70 to 100 USD or more, making the total cost potentially exceed 100 to 150 USD. Doing the replacement yourself can significantly reduce expenses.
3.4. Is there a way to bypass the dryer door switch?
Yes, it is technically possible to bypass the door switch by directly connecting the wires that normally run through the switch. However, this is not recommended. The door switch is a crucial safety component that stops the dryer when the door is opened. Bypassing it disables this function, increasing the risk of injury, electrical shock, or fire. For safety and compliance with appliance standards, always replace a faulty switch rather than bypassing it.
3.5. Why does my dryer keep turning when I open the door?
If your dryer continues running when the door is opened, the door switch is likely stuck in the closed position or has failed entirely. This malfunction prevents the control board from receiving the correct signal to stop the drum. Not only is this a safety hazard, but it may also lead to overheating. Replacing the door switch should resolve the issue and restore the dryer’s automatic shutoff function.
3.6. Can you switch the dryer door opening?
Yes, most modern dryers are designed with reversible doors. This means you can change the direction the door opens (from left to right or right to left) to better fit your laundry room space. The process usually involves unscrewing the door hinges and latch assembly, then reattaching them on the opposite side. It is important to follow the manufacturer’s instructions closely to ensure proper alignment and sealing. Note that reversing the door swing is separate from replacing the door switch.
Knowing how to replace a dryer door switch can save you both time and money while keeping your appliance running safely and efficiently. With just a few basic tools and the right part, this simple DIY repair helps restore full functionality to your dryer. If you’re looking for a reliable dryer replacement parts, AZParts offers a wide selection of dryer components. Whether you're performing a single fix or preparing for future maintenance, having quality parts on hand makes all the difference.
Contact Information:
- 8 The Green, Ste A, Dover, Delaware 19901-3618, United States
- support@azparts.com
Read more:
Dryer
- Key Takeaways
- 1. Common symptoms of a faulty dryer door switch
- 2. How to Replace Door Switch on Dryer
- 2.1. Step 1: Gather Your Materials and Tools
- 2.2. Step 2: Safety First
- 2.3. Step 3: Access the Broken Door Switch
- 2.4. Step 4: Disconnect the Faulty Switch
- 2.5. Step 5: Remove the Broken Switch
- 2.6. Step 6: Install the New Door Switch
- 2.7. Step 7: Reconnect the Wiring
- 2.8. Step 8: Reassemble the Dryer
- 2.9. Step 9: Test the Dryer
- 2.10. Step 10: Final Checks and Celebration
- 3. FAQs about Dryer Door Switch Replacement
- 3.1. How do you change the door switch on a dryer?
- 3.2. How do you know if your dryer door switch is bad?
- 3.3. How much does it cost to replace a dryer door switch?
- 3.4. Is there a way to bypass the dryer door switch?
- 3.5. Why does my dryer keep turning when I open the door?
- 3.6. Can you switch the dryer door opening?
Further Reading
Further Reading

Repair help
April 1, 2026
If your dryer has suddenly stopped working, won’t start, or fails to complete a cycle, the problem might be easier to fix than you think. In many cases, replacing a faulty component can get your dryer running again without the need for expensive repairs. In this guide, we’ll walk you through the 7 most common reasons your dryer isn’t working and what you can do to fix them. We’ll also point you to the specific dryer parts available at AZParts that can help you resolve each issue.

Repair help
December 28, 2025
When your dryer won’t spin, even the smallest load becomes a hassle. In this guide, AZParts walks you through the most common causes, from power and startup issues to mechanical breakdowns and motor failures. You’ll also find practical advice on handling safety and sensor dryer problems, along with a step-by-step diagnostic guide to help you identify the problem and get your dryer working again.

Repair help
November 28, 2025
Does your dryer smell like mildew every time you open the door? That musty odor is a common sign of moisture buildup and poor ventilation, often caused by clogged lint traps, dirty vents, or worn-out parts. While regular cleaning is essential, truly eliminating the dryer issue may require replacing faulty components such as lint screens, door seals, or vent hoses. In this article, AZParts explore the common causes behind why your dryer smells like mildew and provide practical tips to eliminate those unpleasant odors.

How-To Guides
November 20, 2025
Dryer running cold? The heating element is probably broken. Learn how to fix the heating element in the dryer yourself, it's easier than you think and saves repair costs. This comprehensive guide will walk you through identifying, removing, and installing a new heating element in your dryer, with expert tips from AZParts to ensure your clothes are drying efficiently again in no time.

Review
November 19, 2025
Choosing the right dryer vent hose is more important than you think. Each dryer vent hose type affects your dryer's efficiency and safety differently. In this article, AZParts will introduce the most common types of dryer vent hose, compare their pros and cons, and help you pick the best fit.