How-To Guides
How to Safely Discharge an Air Conditioner Capacitor at Home
AZparts Team
Updated on July 11, 2025
7 min read
If you’re troubleshooting your AC system, knowing how to discharge an air conditioner capacitor is one of the most important safety steps. Capacitors store electrical energy even when the unit is off, and touching them without proper precautions can lead to serious shock. Whether you're replacing a faulty part or inspecting your unit, safely discharging the capacitor protects both you and your equipment. In this article, AZParts will help you become confident with basic but effective HVAC repairs.

1. Why Safe Discharge of an AC Capacitor Matters
Working with air conditioner components involves serious electrical risks, especially when handling the capacitor. Understanding AC capacitor safety is crucial because these components can retain an electrical charge even after the system is powered off. This residual energy poses a risk of electric shock if not discharged properly. That is why discharging capacitors is not just a recommendation—it is a necessary step to avoid accidents.
Failing to safely discharge a capacitor before repair or replacement can lead to severe injuries or equipment damage. The capacitor electrical hazard is often underestimated, but even a small mistake can result in painful shocks or fire risks. Practicing proper HVAC electrical safety includes turning off power at the breaker, using insulated tools, and verifying the capacitor is fully discharged before touching it. These precautions help ensure the safety of both the technician and the system itself.
2. Tools and Equipment You’ll Need Before Discharging an AC Capacitor
Before attempting to discharge an AC capacitor, make sure you have the proper tools and safety gear ready. Using the right equipment not only ensures accurate diagnosis but also protects you from electrical hazards. Below are the essential items every homeowner or technician should have when working on an HVAC capacitor:
- Multimeter: A multimeter is used to measure the capacitor’s voltage and test for any remaining electrical charge. It helps confirm whether the capacitor is safe to handle.
- Capacitor Tester: This tool allows you to measure capacitance and evaluate whether the capacitor is functioning within its rated specifications. It’s especially useful when diagnosing weak or failing capacitors.
- Screwdriver with Insulated Handle: Use this tool to safely discharge the capacitor by bridging its terminals. The insulation protects you from electrical shock during the discharge process.
- Insulated Gloves: Wearing rubber or insulated gloves adds a layer of protection against accidental electrical contact. They are a must-have for any HVAC electrical task.
- Safety Goggles: Safety goggles shield your eyes from potential sparks or debris while working near electrical components. They help prevent injury in case of unexpected discharge.
- Flashlight or Work Light: Good lighting helps you clearly see the capacitor terminals and wiring, especially when working in dim areas like basements or utility closets.
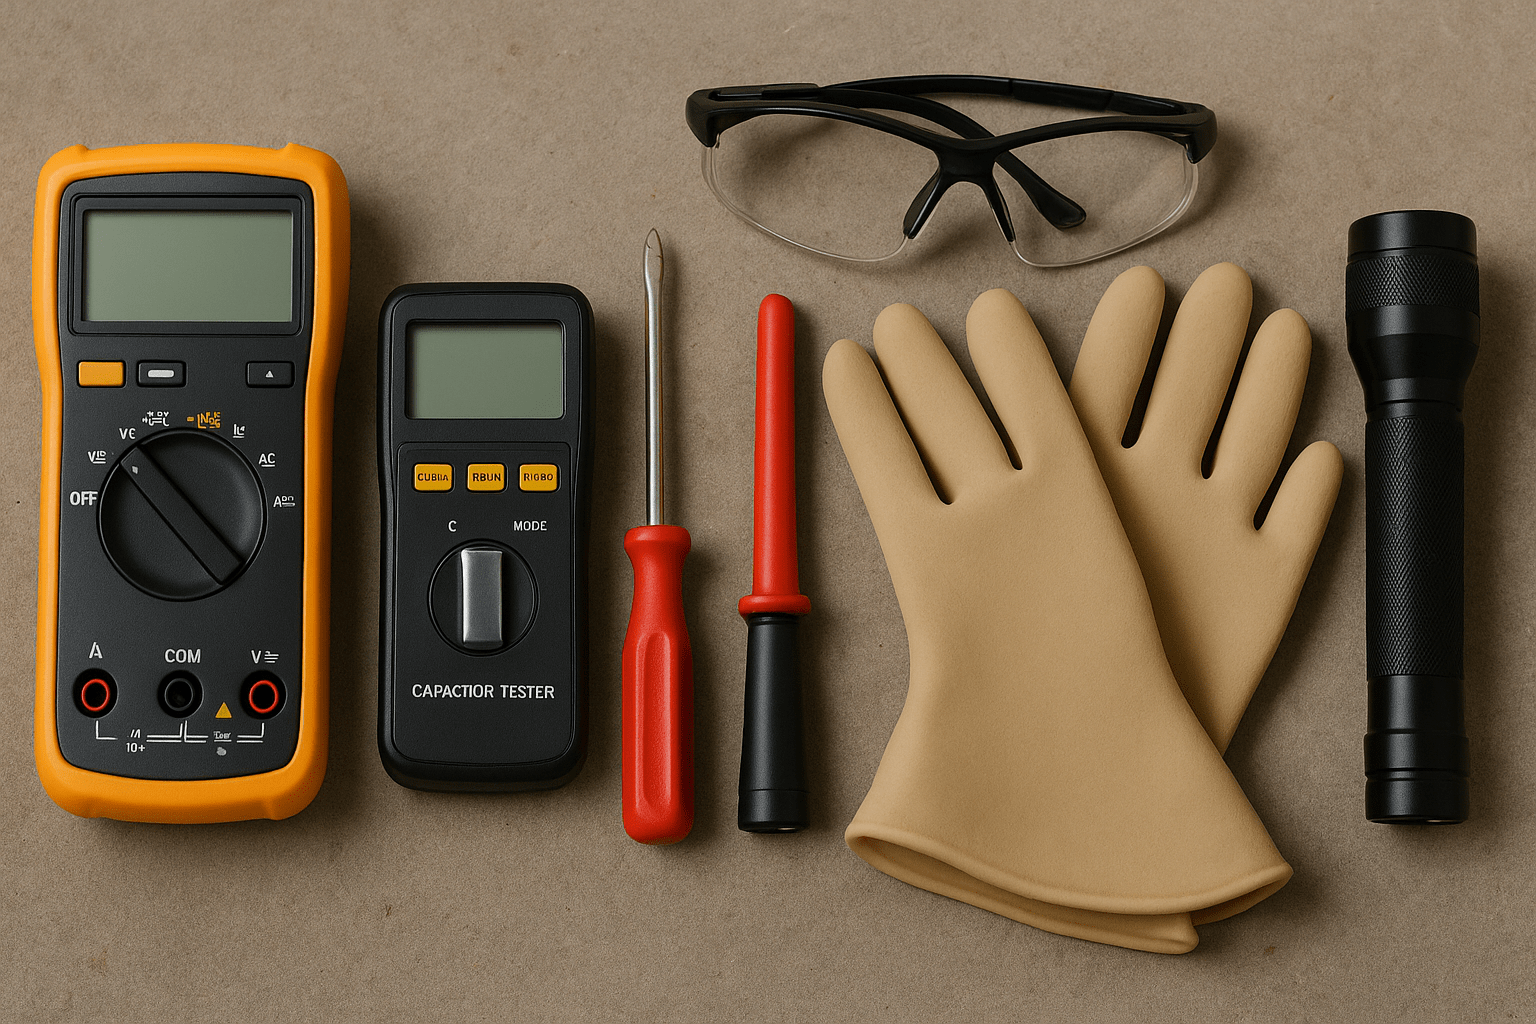
Tools and equipment you’ll need before discharging an AC capacitor (Source: AZParts)
3. Step-by-Step Guide to Discharging an AC Capacitor at Home
Discharging your AC capacitor safely is an essential part of any AC maintenance DIY project. Before attempting to repair or replace the capacitor, homeowners need to follow proper capacitor discharge steps to avoid serious electrical hazards. This HVAC repair guide outlines clear and safe procedures for anyone wondering how to discharge an AC capacitor at home.
3.1. Step 1 – Shut Off Power from Breaker Box and Unplug the Unit
The first and most critical step is to turn off power to your air conditioner. You should identify the correct circuit breaker that controls your HVAC system and switch it to the off position. If the unit has a plug, you should also unplug it from the outlet. This action ensures that no electricity reaches the capacitor during the repair, which is essential for your safety.
3.2. Step 2 – Wear Safety Goggles and Insulated Gloves
Before you handle any electrical components, you must wear proper safety gear. You should put on safety goggles to protect your eyes and insulated gloves to protect your hands. These items significantly reduce the risk of electric shock or accidental sparks while working near live circuits.
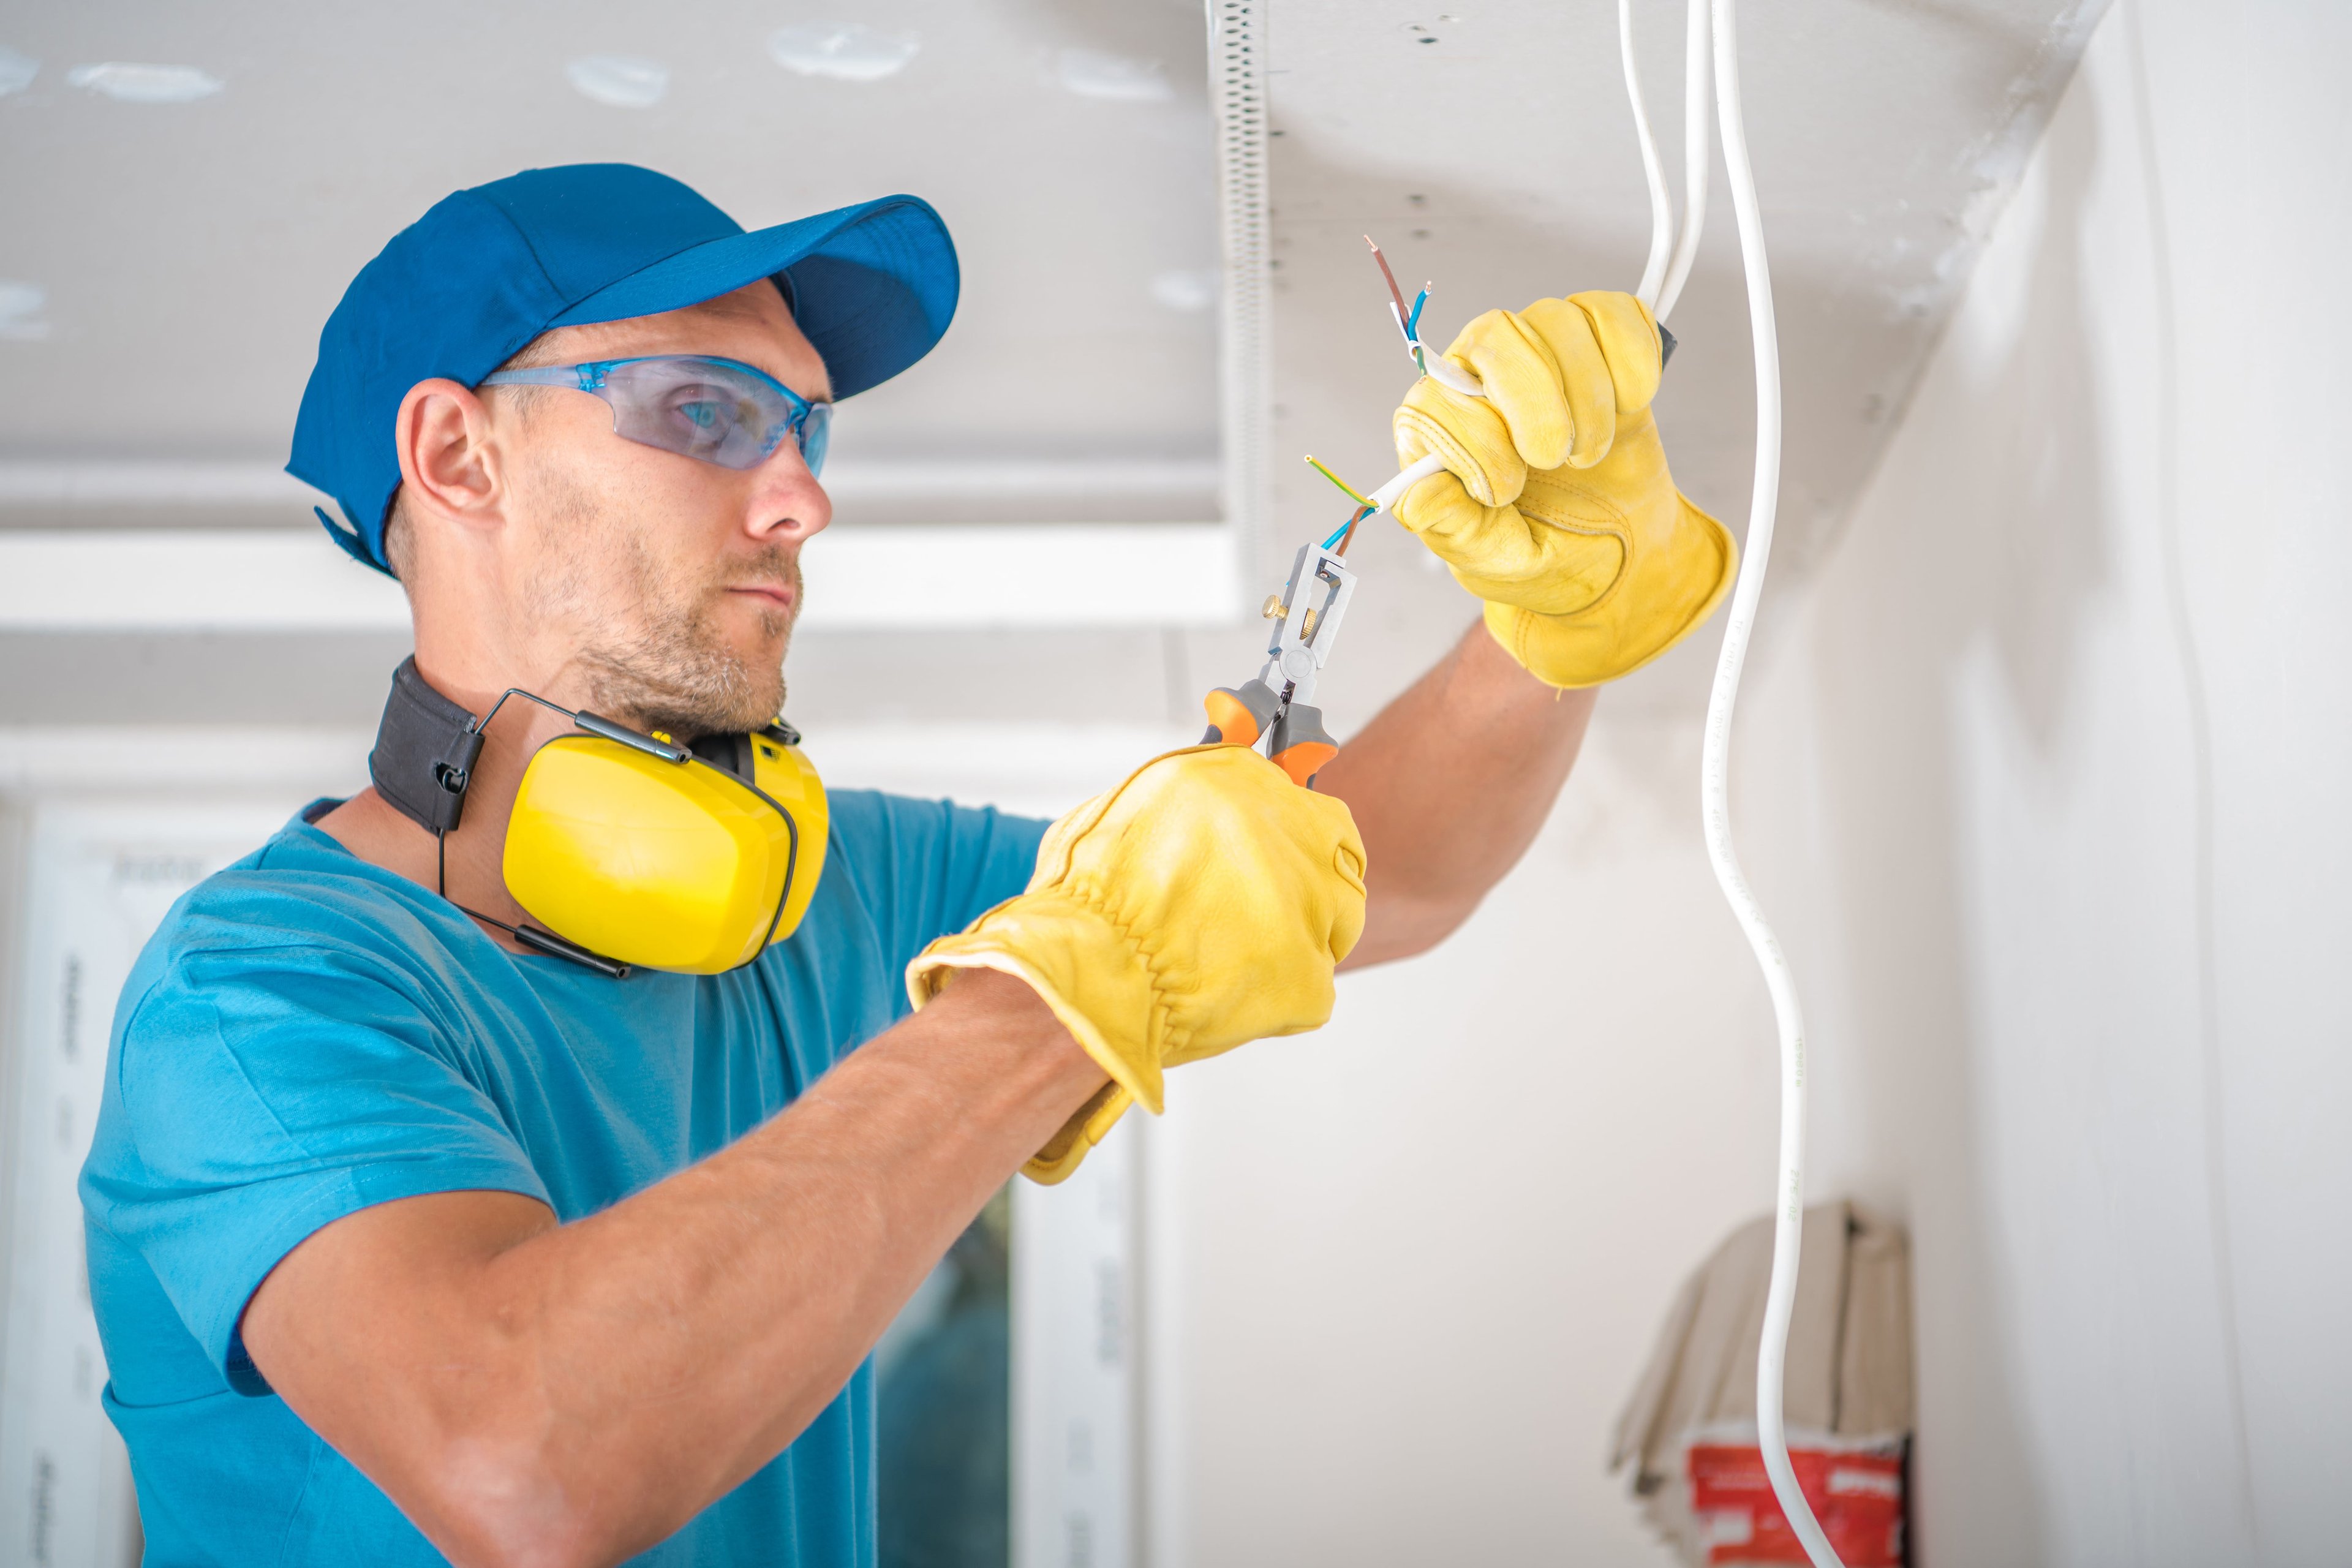
Before handling any component, you need to put on safety goggles and insulated gloves (Source: AZParts)
3.3. Step 3 – Inspect the Capacitor for Visible Signs of Damage
After putting on safety gear, you should visually inspect the capacitor. You need to look for signs of bulging, corrosion, or any visible leaks. A leaking or swollen capacitor indicates internal failure and can be hazardous. This initial inspection helps you determine whether it is safe to proceed.
3.4. Step 4 – Use a Multimeter to Measure Stored Voltage
Once the visual check is complete, you should use a multimeter to check for stored voltage. You must set the multimeter to an appropriate setting for AC testing and then place the probes on the capacitor terminals. If the reading shows voltage, the capacitor still holds a charge and is unsafe to touch.
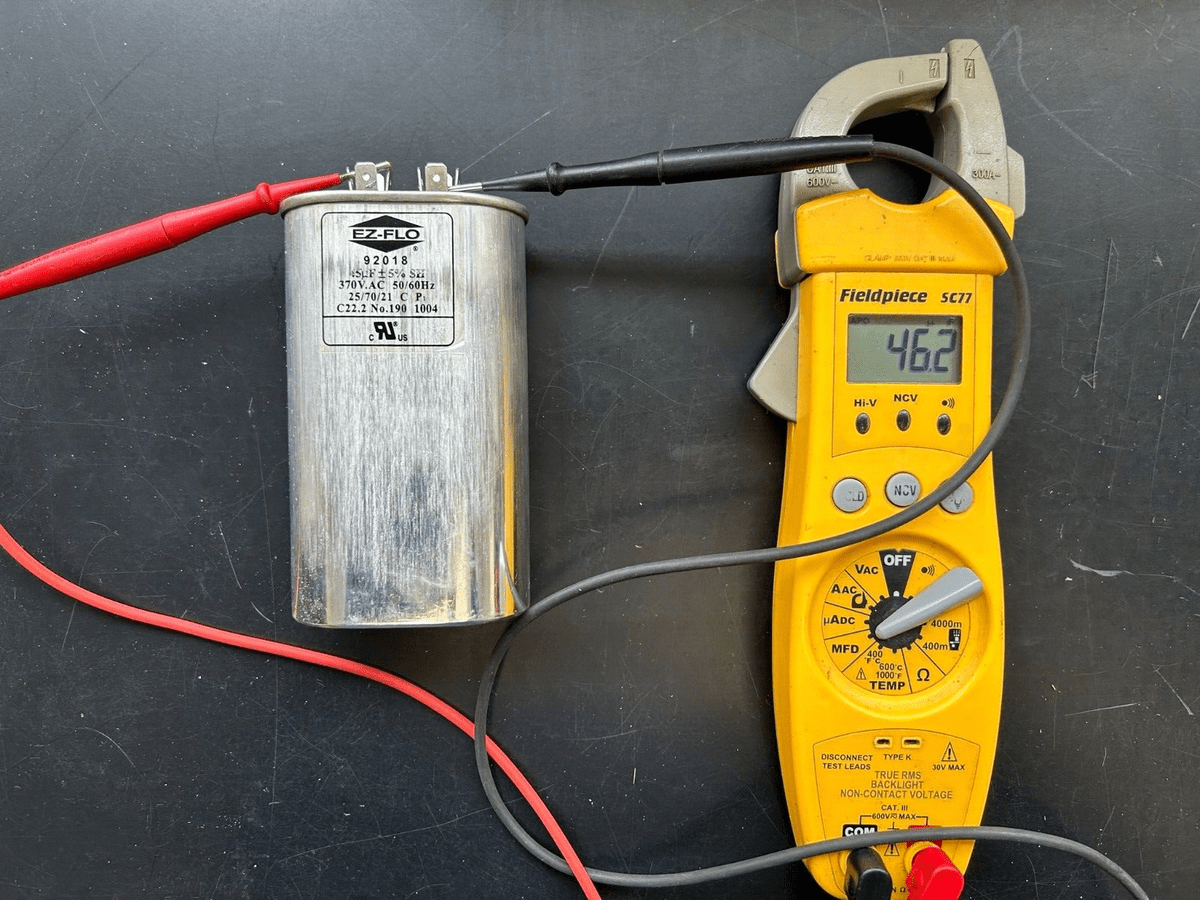
You must set the multimeter to an appropriate setting for AC testing (Source: AZParts)
3.5. Step 5 – Test Capacitor for Charge or Malfunction
While the multimeter is still connected, you should perform a continuity test on the capacitor. A functioning capacitor will show continuity briefly before the reading drops to an open circuit. If the meter shows no continuity or erratic behavior, the capacitor may be defective.
3.6. Step 6 – Confirm Discharge Using Screwdriver with Insulated Handle
After confirming that voltage has dropped to zero, you should use a screwdriver with a fully insulated handle to discharge any remaining electricity. You need to touch the screwdriver across the terminals of the capacitor to complete the discharge. This step ensures that the capacitor is safe to handle before you proceed with replacement or further repairs.
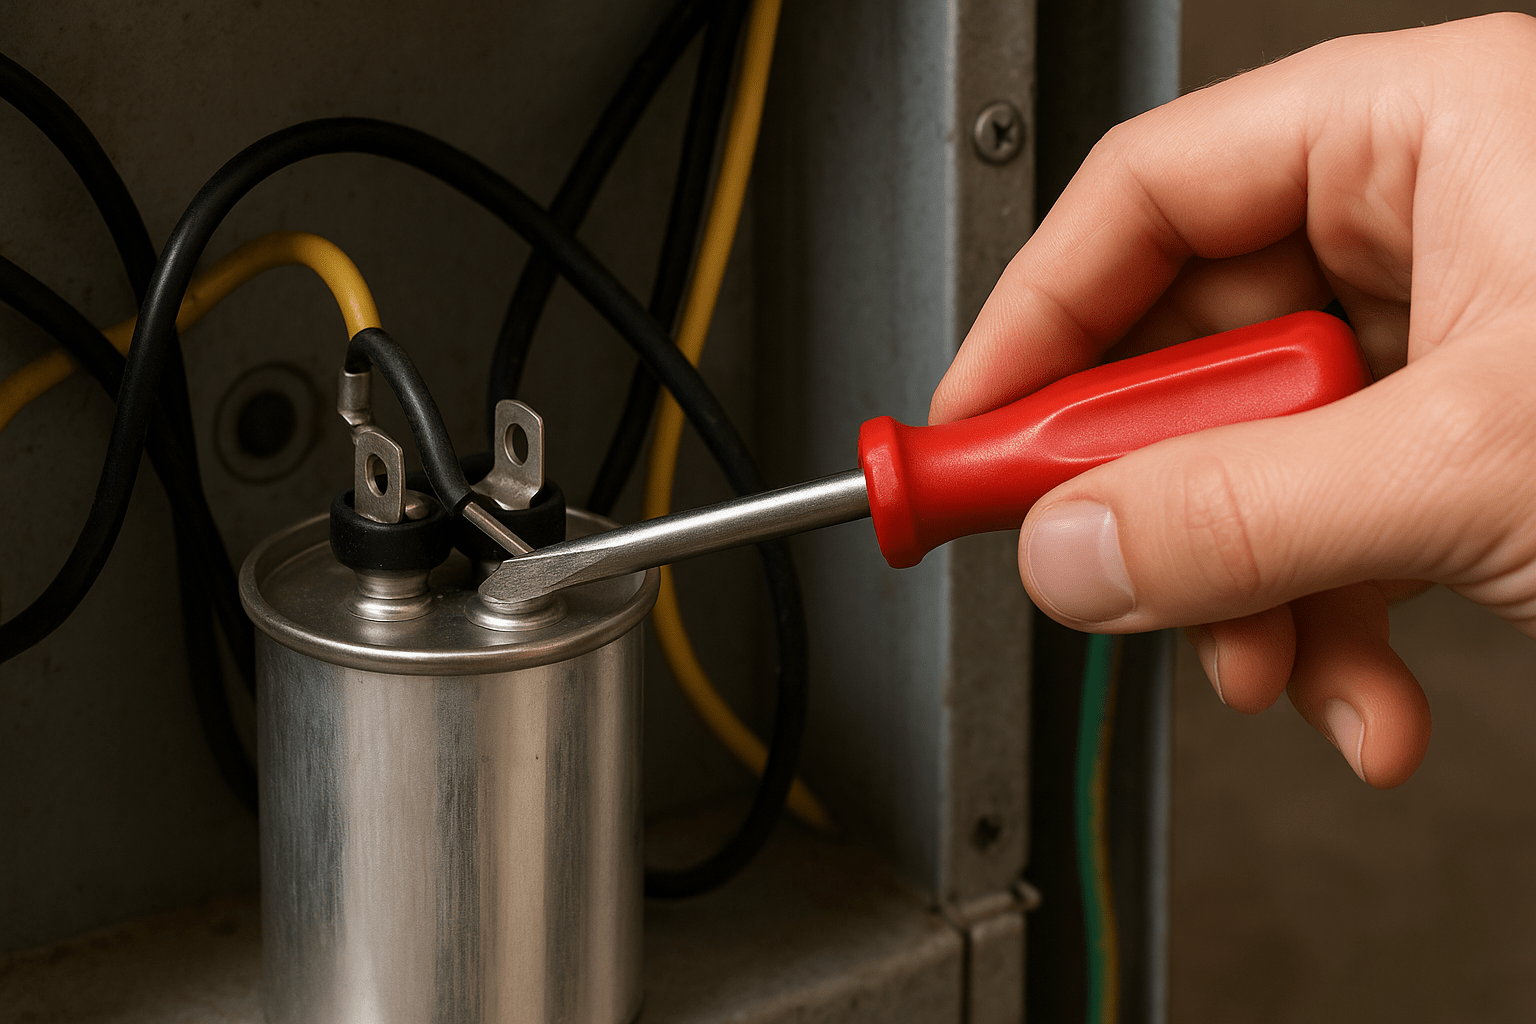
You should use a screwdriver with a fully insulated handle to discharge any remaining electricity (Source: AZParts)
4. Frequently Asked Questions About AC Capacitors and Discharging
How Often Should I Inspect or Replace My AC Capacitor?
You should inspect your AC capacitor at least once a year, especially before the cooling season begins. Most capacitors last between 5 to 10 years, depending on usage and environmental conditions.
What Should I Do If My Capacitor Fails in Hot Weather?
If your capacitor fails during hot weather, your AC unit may stop cooling entirely. The first step is to turn off the system to avoid further damage. Contacting an HVAC technician as soon as possible is recommended, especially during heatwaves when systems are under heavy load. Avoid using the AC until the faulty part is replaced to prevent damage to the compressor or fan motor.
Are AC Capacitors Interchangeable or Model-Specific?
AC capacitors are model-specific and must match the original unit’s voltage and microfarad (µF) ratings. Using the wrong capacitor type can lead to poor performance or system failure. It’s important to refer to your HVAC unit’s specifications or consult with a professional before purchasing a replacement. Universal capacitors exist but must still match key specifications to work correctly.
Can Weather and Environment Impact Capacitor Performance?
Yes, extreme temperatures and environmental factors can affect capacitor performance. High heat, humidity, and exposure to debris can shorten the life of the component. Capacitors installed in outdoor units are particularly vulnerable to these conditions. Protective covers and proper ventilation can help reduce environmental impact and extend the lifespan of your AC parts.
What If My Capacitor Is Leaking or Swollen?
A leaking or swollen capacitor is a clear sign of failure and should be replaced immediately. These symptoms indicate internal pressure buildup or fluid leakage, both of which pose safety hazards. Do not attempt to use or test a visibly damaged capacitor. Turn off the system and arrange for a safe replacement as soon as possible.
Do AC Warranties Cover Faulty Capacitors?
In many cases, AC warranties do cover faulty capacitors, especially if the unit is still under manufacturer warranty. However, coverage depends on the terms and conditions of the warranty agreement. It’s important to check your documentation or consult the manufacturer directly. Keep in mind that DIY repairs may void the warranty if not handled by a licensed technician.
Discharging an air conditioner capacitor at home requires careful preparation and attention to safety. You must ensure the system is completely powered off before beginning any work. You should also wear protective gear and use a multimeter to confirm there is no stored voltage. These steps help protect you from electrical shock and prevent damage to your HVAC system. If you need the replacement capacitor, or covers, piercing valves and port adapters, AZParts provides high-quality components you can trust. You can complete your repair safely when you use the right parts and follow proper procedures.
Contact Information:
8 The Green, Ste A, Dover, Delaware 19901-3618, United States
Air conditioner
- 1. Why Safe Discharge of an AC Capacitor Matters
- 2. Tools and Equipment You’ll Need Before Discharging an AC Capacitor
- 3. Step-by-Step Guide to Discharging an AC Capacitor at Home
- 3.1. Step 1 – Shut Off Power from Breaker Box and Unplug the Unit
- 3.2. Step 2 – Wear Safety Goggles and Insulated Gloves
- 3.3. Step 3 – Inspect the Capacitor for Visible Signs of Damage
- 3.4. Step 4 – Use a Multimeter to Measure Stored Voltage
- 3.5. Step 5 – Test Capacitor for Charge or Malfunction
- 3.6. Step 6 – Confirm Discharge Using Screwdriver with Insulated Handle
- 4. Frequently Asked Questions About AC Capacitors and Discharging
- How Often Should I Inspect or Replace My AC Capacitor?
- What Should I Do If My Capacitor Fails in Hot Weather?
- Are AC Capacitors Interchangeable or Model-Specific?
- Can Weather and Environment Impact Capacitor Performance?
- What If My Capacitor Is Leaking or Swollen?
- Do AC Warranties Cover Faulty Capacitors?
Further Reading
Further Reading

Repair help
July 31, 2025
If your air conditioner suddenly stops cooling and you're left wondering why, there's a high chance you're dealing with an AC fan not working. Whether the fan doesn’t spin, makes noise, runs slowly, or turns on and off randomly, these problems can significantly reduce the unit's efficiency—or worse, cause further damage. In this guide, we’ll walk you through five common fan malfunctions, how to diagnose them, and what you can do to fix each. And if you ever need to replace a faulty part, AZParts is here to help with top-quality AC components, expert support, and fast shipping.

Review
July 25, 2025
As temperatures begin to drop, many homeowners wonder: should I cover my air conditioner in the winter? While the instinct to protect your investment is understandable, the reality may surprise you. Covering your AC might not only be unnecessary as it can sometimes cause more harm than good. Let’s explore the facts with AZParts so you can make an informed decision this winter.

How-To Guides
July 24, 2025
As the temperature drops, preparing your home for winter becomes a priority, which includes taking proper care of your air conditioner. Failing to winterize your air conditioner can lead to rust, wear, and costly damage, especially to your outdoor unit. In this guide, AZParts will walk you through 6 simple steps to winterize your air conditioner, followed by one professional recommendation that can greatly extend your unit’s performance and durability.

Other
July 14, 2025
When your air conditioner starts acting up, a faulty capacitor is often the cause, and understanding the capacitor replacement cost can help you plan ahead. Whether you’re considering a quick DIY fix or calling in a professional, knowing what to expect financially is key. In this guide, AZParts breaks down average replacement prices, types of capacitors, factors that affect cost, and tips to save money.

Repair help
July 9, 2025
Is your air conditioner running but blowing out warm or hot air instead of cool air as it should? This is a fairly common issue, especially during hot days when the demand for cooling is high. Many people assume the unit is seriously damaged, but in reality, the problem often comes from simple causes like incorrect settings, a dirty air filter, or low refrigerant levels. In this article, let AZParts help you uncover the reasons why your air conditioner is blowing hot air, along with practical solutions and usage tips to help you avoid this issue in the future.